


Chicken Meals In Shelf Stable Jars
via European Water Bath Canning.

Argh! Edited to add, once your jars are filled with the meat and veg and herbs etc, top each jar up to just below the lip with clean filtered water! Can’t believe I forgot that. Sorry. *blush*…
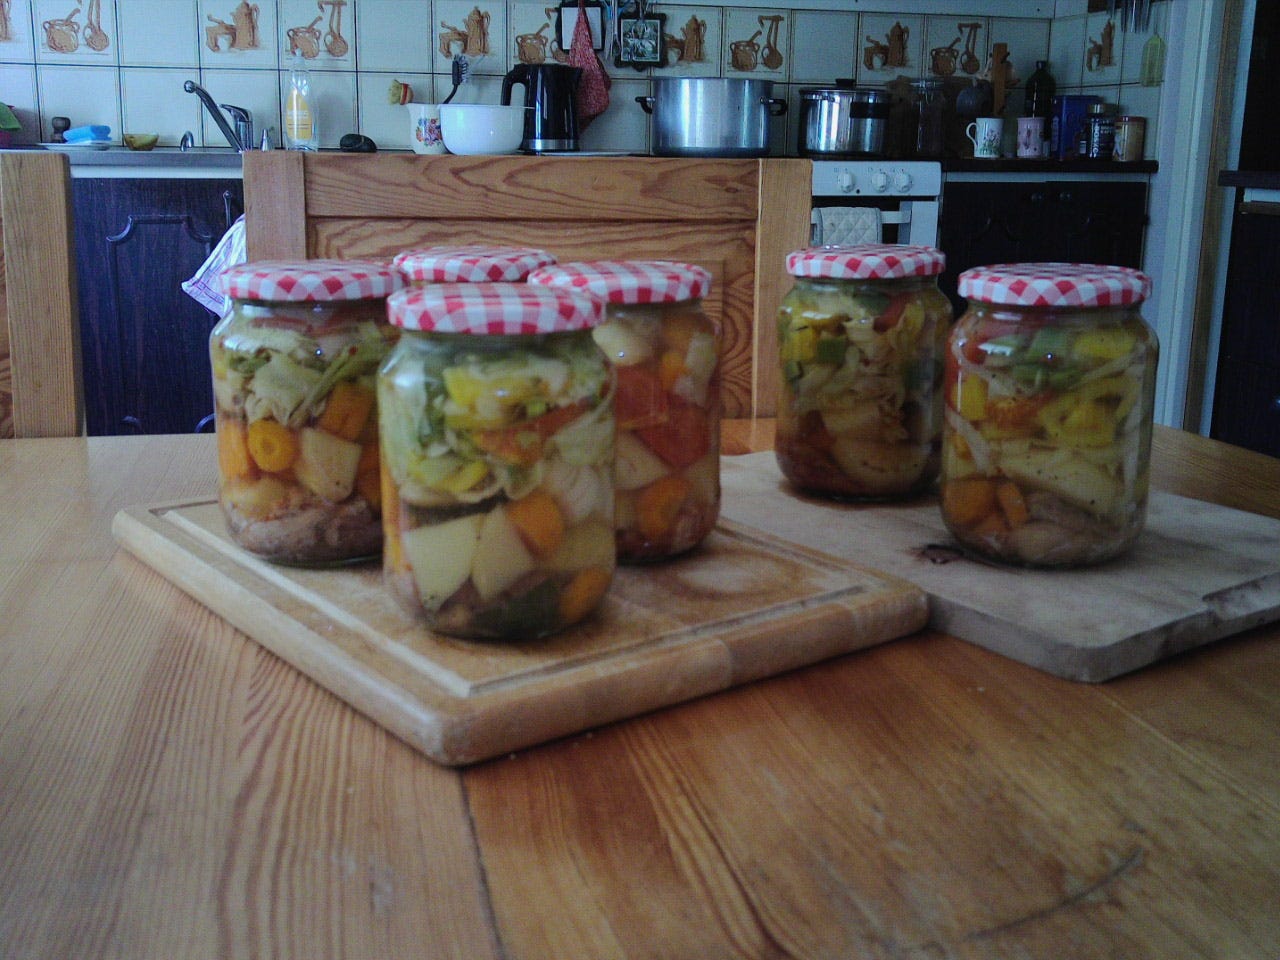
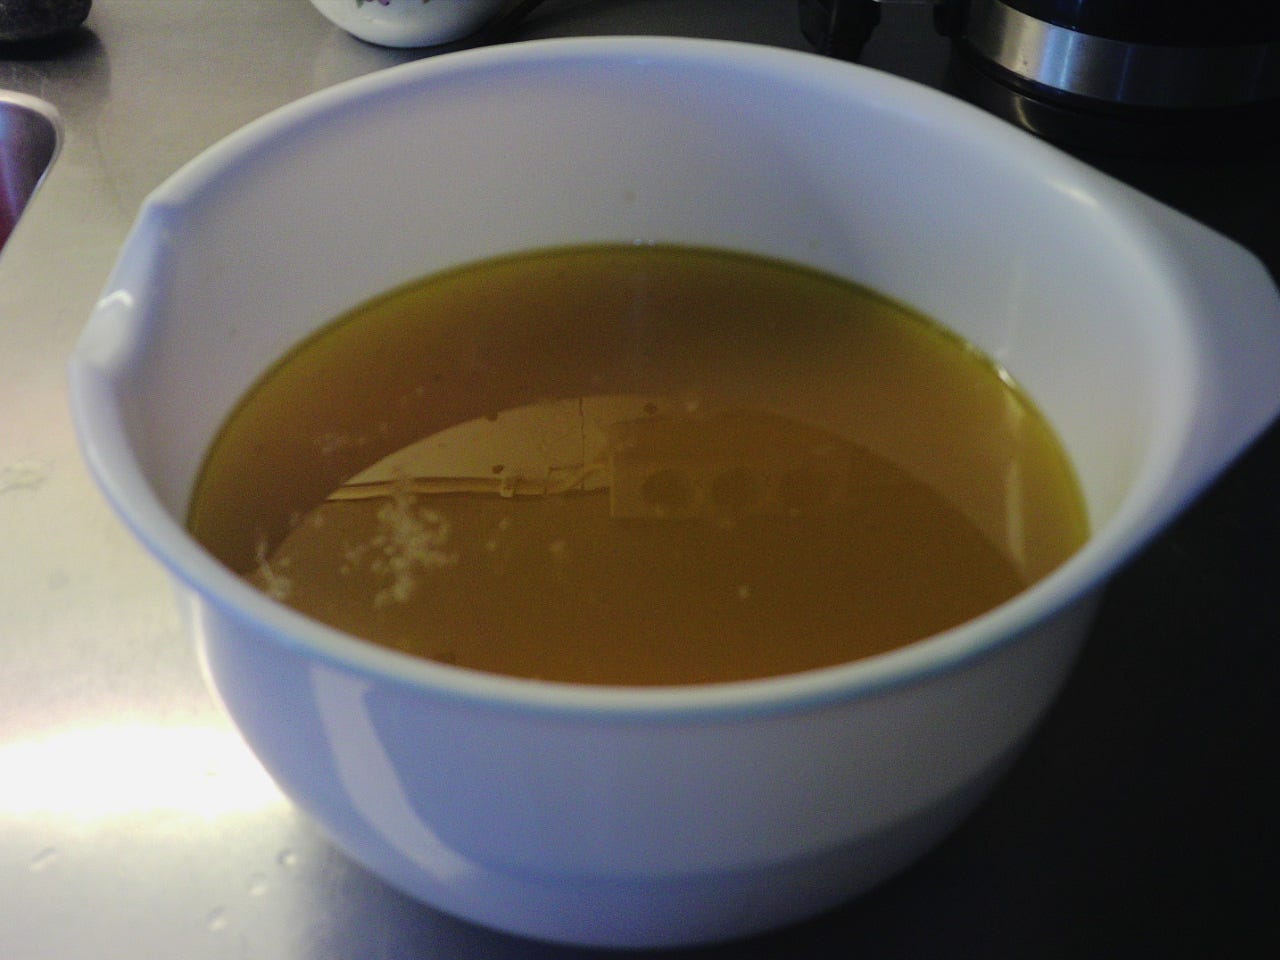
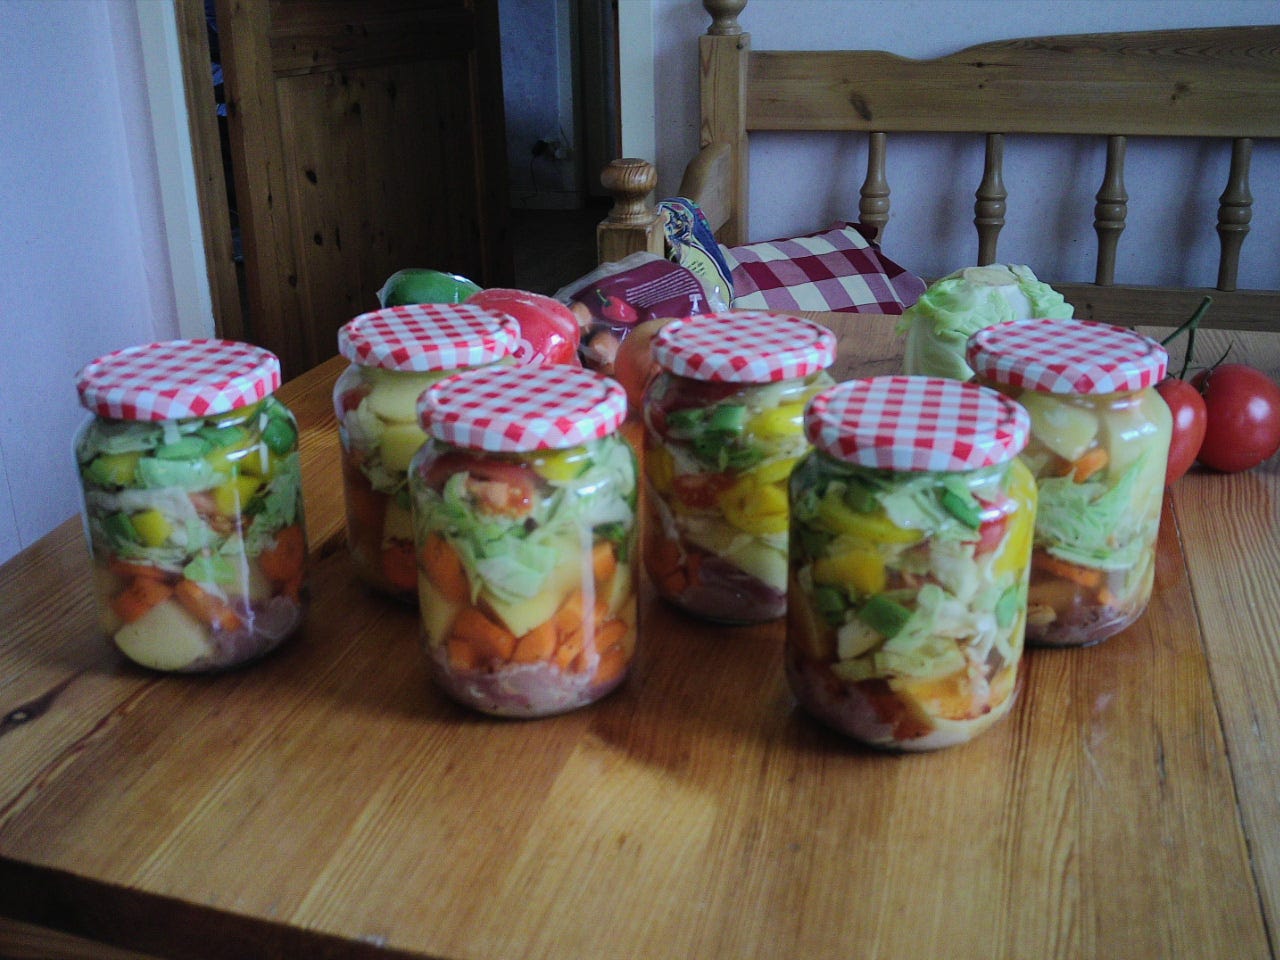
Edited again to add the results after canning, plus pic of the chicken stock. Already the jar lids have slightly sunk in to make the seals. Tomorrow, once the jars are completely cooled (they’re still awful hot) they go into the pantry where it’s cool and dark and that is six jars of shelf stable chicken dinners, preserved for up to two years. The stock will be reduced (boiled down to be more concentrated) tomorrow, then w/b canned too to keep for soup or casserole making. Never waste a good chicken! Use as much of it as you can. :)
(thanks SS for sorting out the editing glitch.)
Just wanted to share today’s batch. :) First things first though, some folks are afraid to water bath can (jar) meat due to fear of botulism. Folks can research this of course, but botulism cannot form or thrive in an acid environment. This is why they tell you it’s safe to can tomatoes, rhubarb etc which are acidic foods.
When in Europe we water bath can, we add strong vinegar to each jar if the contents are not naturally acidic. So long as your vinegar is over 9% strength…and yes, you can use two TABLESPOONS of 5% vinegar if that is all you have…then you are making that food in the jar acidic. So, no botulism.
Any other issues are exactly the same as with pressure canning and mistakes are often down to basic hygeine problems, faulty lids or wrong canning timing.
That is the main reason folks are put off water bath canning..the fear of botulism. So long as you remember to keep your foods acidic, and we do that by adding vinegar (you can use lemon juice instead if you like, one whole lemon full per jar, but it’s an awful expensive way of doing it imo unless you specifically want that flavouring too) and in case folks worry the food tastes strongly of vinegar, I can assure you it doesn’t. In fact the added vinegar has the bonus of tenderising tougher cuts of meat so it helps economically.
Today I culled and butchered one of our “spare” roosters. He wasn’t as big as the last one I shared but even being just a few months old he is still bigger than the pigeon sized chickens they sell in the shops here. I literally cannot remember the last time I saw a fully grown chicken for sale here in Sweden!
I put aside much of the meat to make meals for us tomorrow, and today used the meat we don’t eat much of..the darker meat such as leg meat, wings etc…to make w/b jarred meals for the pantry.
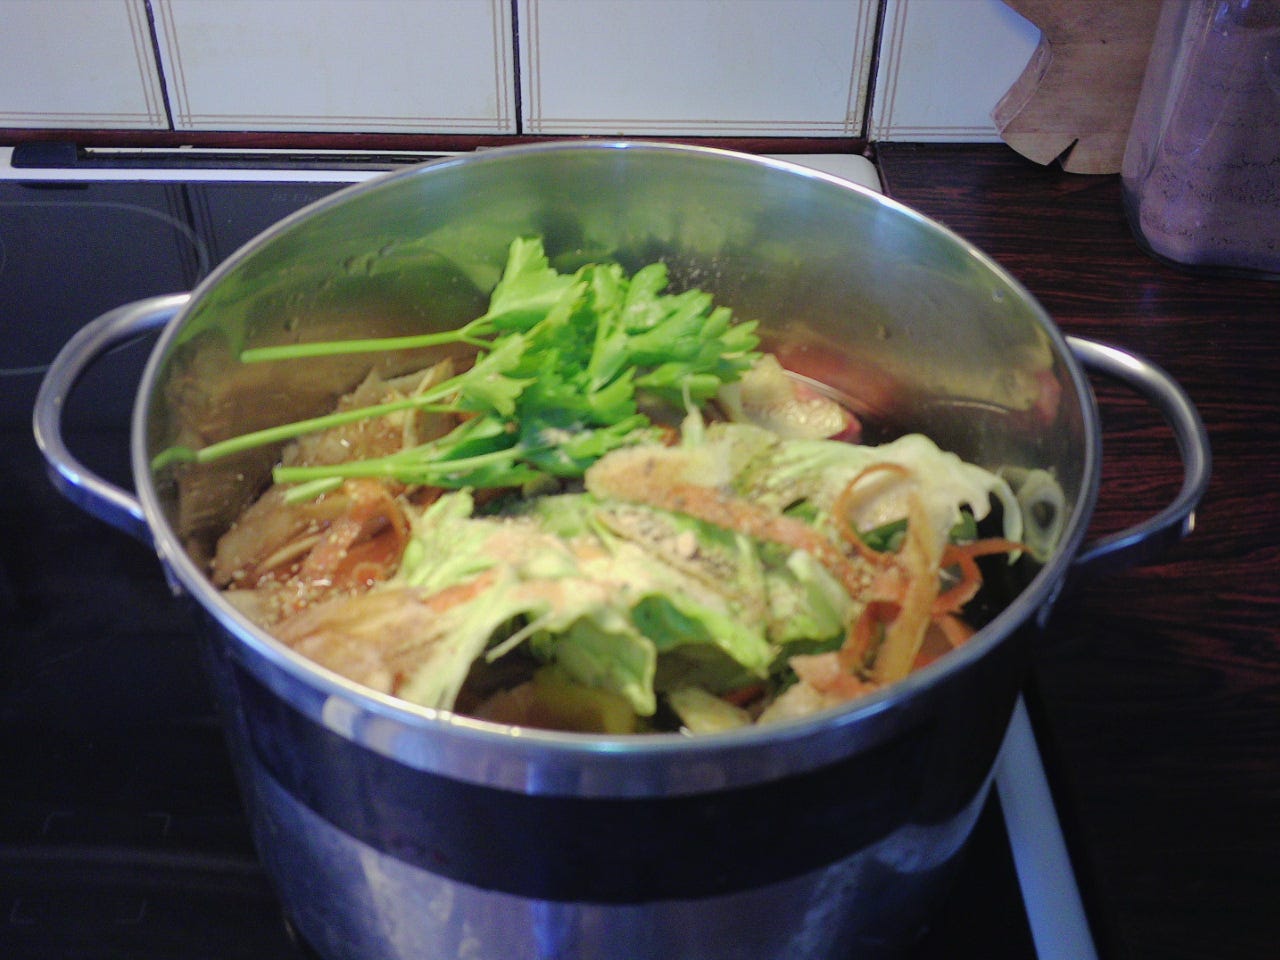
So in the first pics you can see the meat in the bowl. I had my lovely hubby cut the meat off the bone for me. The first pic itself is of my stock pot. When the meat is stripped off the carcass, the bones, skin and vegetable peelings are put into a pot and just covered with water. Celery is added (I grow it in tubs) and herbs to taste as well as salt. Bring it to the boil then turn down to let it simmer for four to five hours. That sounds like a lot but when you realise you’re extracting every last bit of goodness from the carcass of that bird and those veg parings and herbs, and that your home made stock will be not only concentrated but packed full of flavour, it’s worth it.
Second pic shows prepping to fill the jars. Note..I’m messy in my kitchen, lol! Sorry for that. Much as I’d love to show a display type kitchen with not a crumb in sight, that isn’t really me. Please just believe I DO seriously clean up after myself. :)
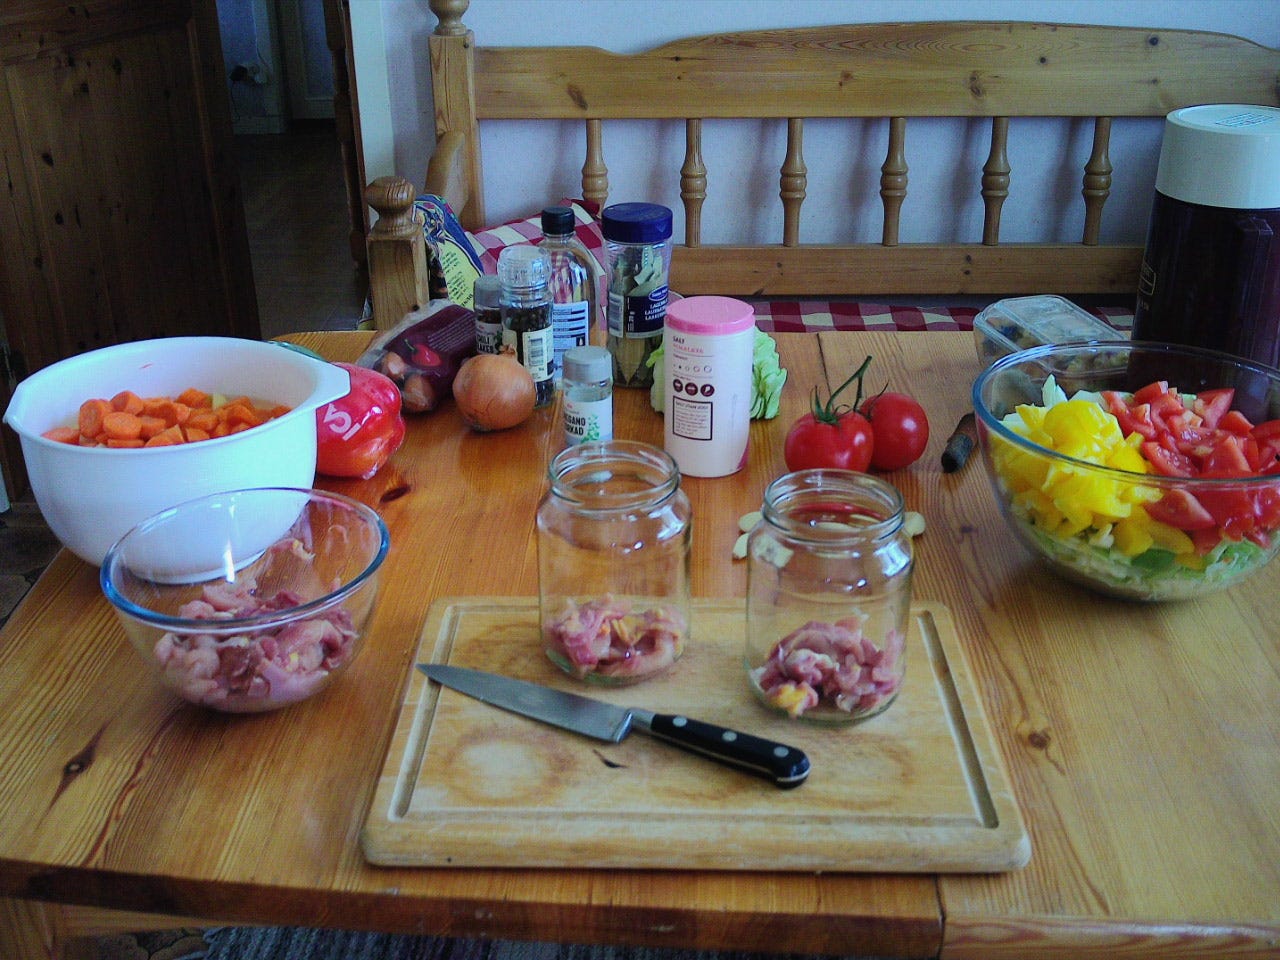
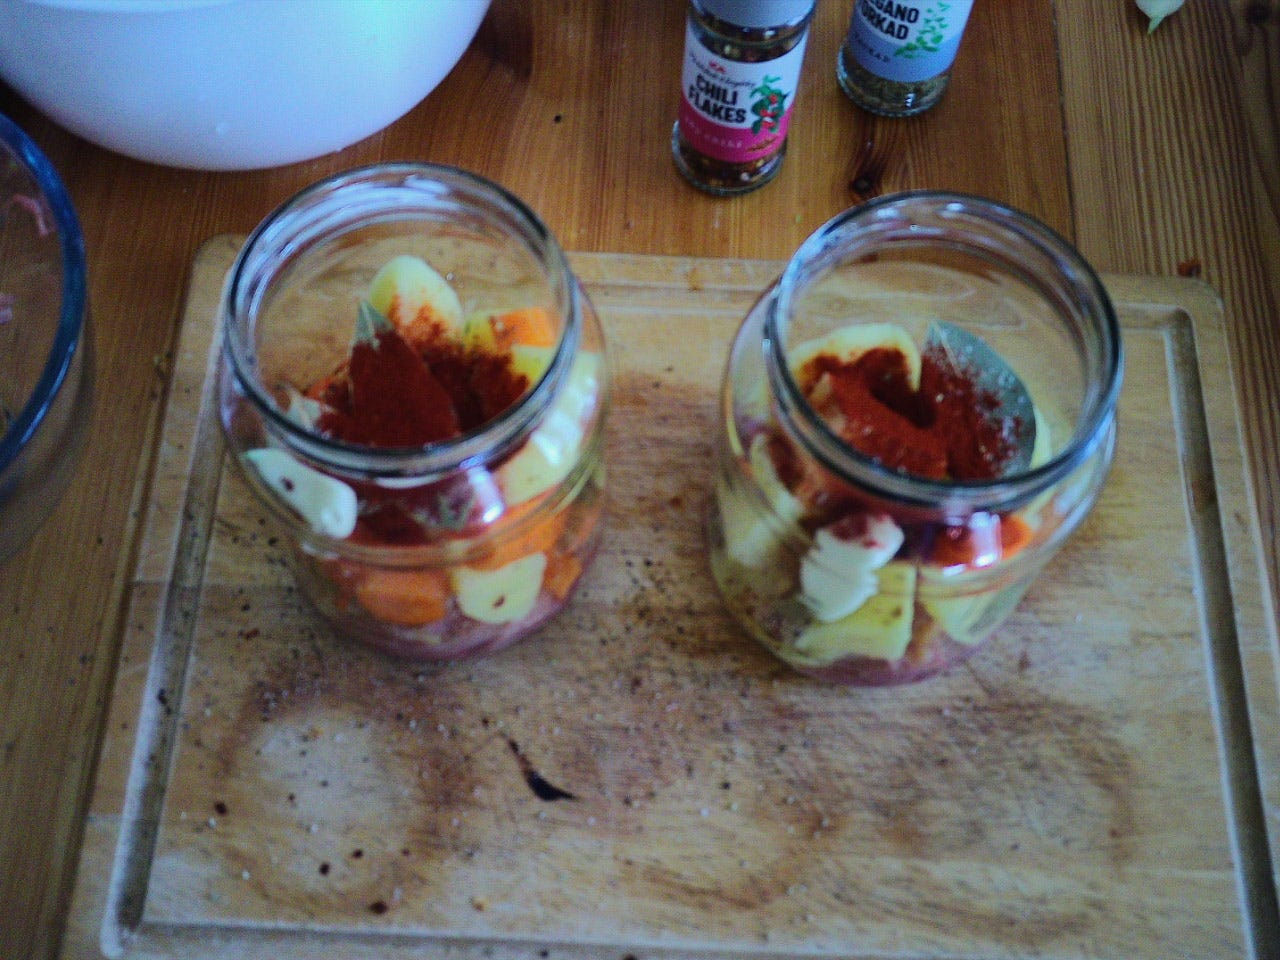
Next pic shows the jars being half filled. I tend to put the meat on the bottom of the jar so it doesn’t, when canning, end up just being mashed up in with the veg. Hope that makes sense. With the jars half full I add bay leaves, one clove of garlic per jar, herbs and spices to taste BUT the most important ingredient is of course, the one that allows us to water bath can anything…the vinegar. I use Attik Sprit of 12% today because I ran out of the 9% and this is the next strength in my cupboards. It’s fine to do that. Please also note when I say “tablespoon” I mean one of the very large spoons. Probably most know it as a “serving spoon” nowadays but previously, this was a tablespoon and those we now call tablespoons were dessert spoons. Yes, I know. But if you don’t have those big serving spoons, use what you’ve got to get say, a tablespoon and a half in each jar. Do not forget the vinegar. Yes, I’m nagging. You can put whatever veg and flavourings to your own taste you like in there, but if you are water bath jarring meat dishes, do NOT forget the vinegar.
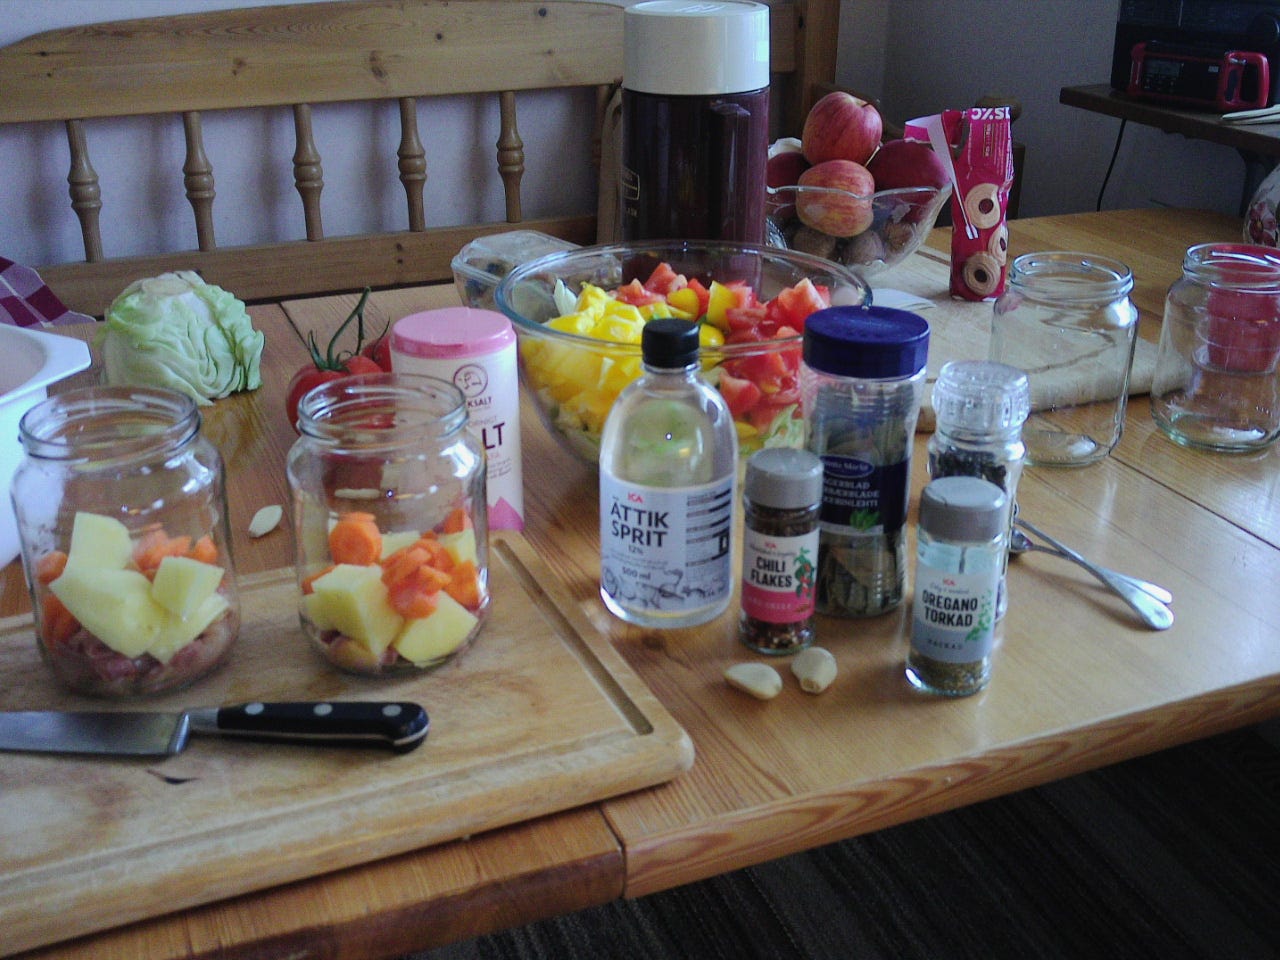
Also, feel free to experiment with flavouring. In some jars I add oregano and sage, or rosemary and parsley. In others, I add chilli flakes and smoked paprika.
The reason I stop halfway to add the herbs and vinegar etc is because it’s easier to do that than fill the jars full up then try to add it.
Once the jars are filled to the top…and please use your hands or any clean implement you like to really fill those jars..push everything down firmly as you can in order to fill the jars….then use a paper towel or clean cloth dipped in vinegar and wipe round the rim of the jars.
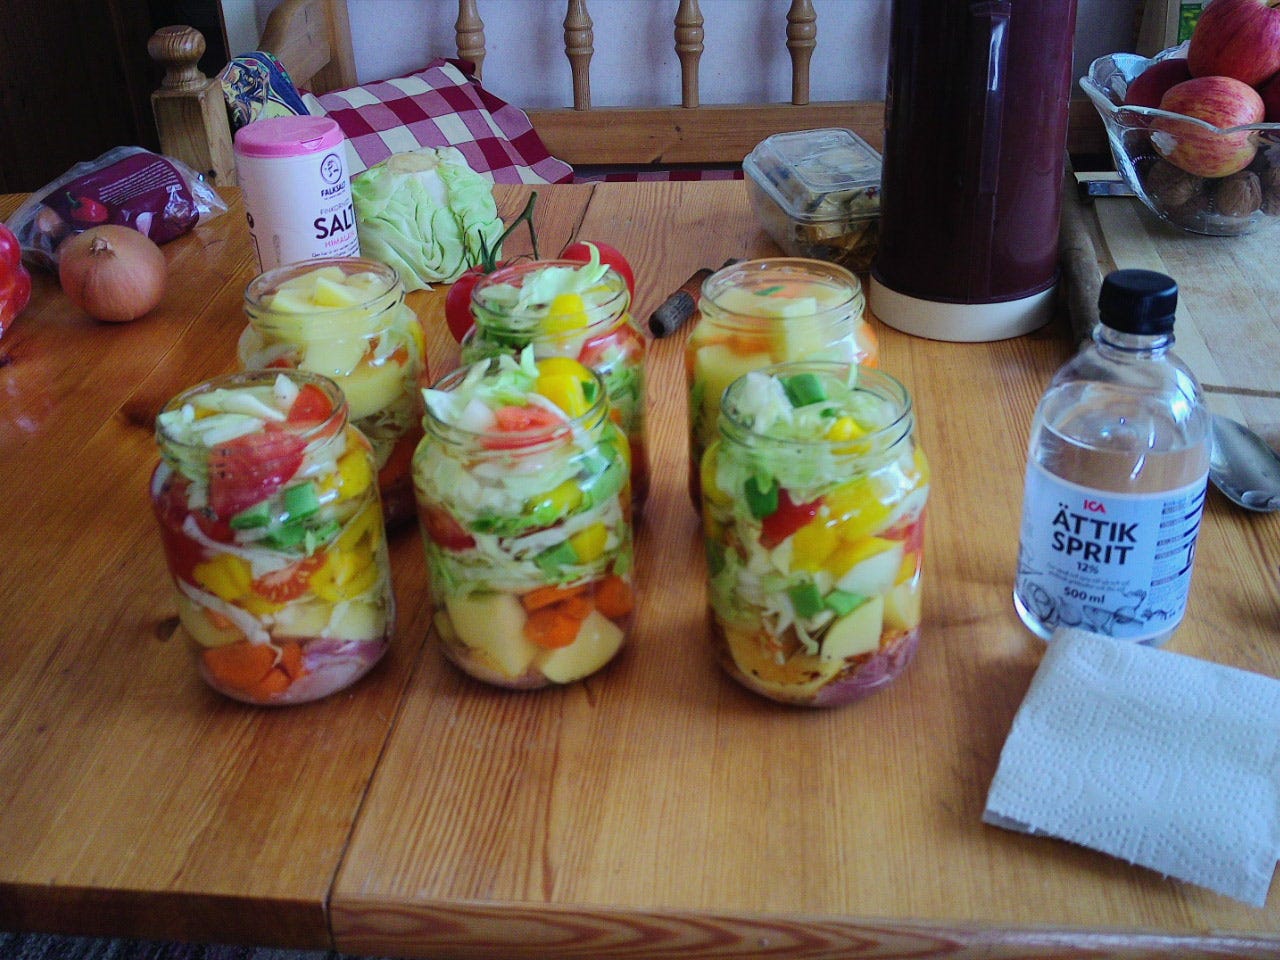
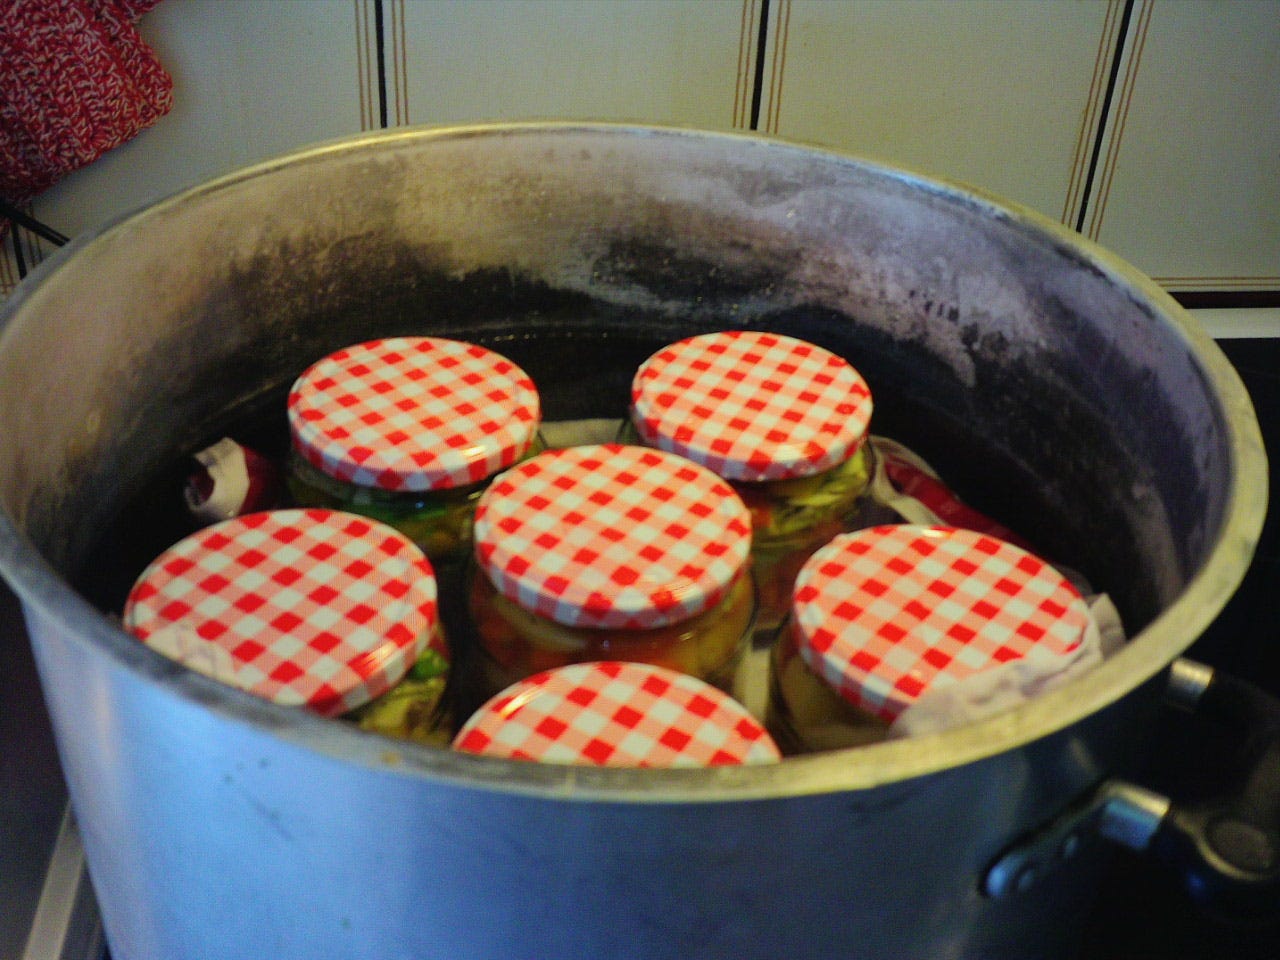
Wee note about the lids here..my wonderful husband surprised me with a gift of six new canning jars with these lids. As you can see there’s no button in the middle of them. They do depress slightly but if this is too nerve wracking for beginners to feel they can trust themselves to know it’s worked ok, then feel free to reuse clean and good condition pasta sauce or other jars with lids which have the button in the middle which is easily seen to depress as it cools down to make a valid seal. Once you’re used to w/b canning though you develop the confidence to recognise a good seal with any lid. One trick, if you like, for ensuring the lids are on right is once you’ve filled the jars, wiped the rims and put the lids on, lift the jar gently and tipping it upside down, bring it close to your ear. There should be NO hissing, gurgling or sound like steam or liquid escaping. Don’t, obviously, do this immediately after canning when the jars are still hot. Do it before you put them in the pot. So, make sure lids are on tight and wipe the outside of the jars in case there’s bits of food stuck to them. Then place gently into your big pot with a folded dish drying towel on the bottom of it to stop the jars breaking with heat and prevent them rattling against the sides of the pot.
I fill the water in the pot just up to below the neck of the jars. Others will completely cover them. The truth is it makes zero difference. Obviously, never let the pot boil dry, but keeping the water topped up..and once it’s reached a rolling boil, turn down to a fast simmer and always top up with freshly boiled water…is easy to do and allows you to keep an eye on the jars.
Because I took the meat off the bone this time, the w/b canning time is four hours instead of six. When the jars are cooled…I leave mine on the kitchen table under a towel overnight…check the seals are secure then store in a dark and cool place like a pantry for up to two years. Don’t forget to label what’s in the jar and put the canning date on it.
Hope this is helpful. Next time I’ll share a pic of my pantry shelves which are filling up nicely with home made meals put by for next winter. Not bragging, but to encourage folks to think about incoming hard times and realise just how easy it is to make home made healthy meals for future use and security.
Because, food security is a thing. A big thing imo. I’ve been hungry more than once in my life. Truly hungry. Think, Scarlett O’Hara and that carrot kind of hungry…..
Immaculate kitchen compared to my red clay dust, open windowed/no AC, cat hair daily, 98 today if lucky; oh and no remote cool dark place to store until I dig a hole in the ground.....But you have me ravenous and plotting at the very sight. You ARE a wonder.
I took the plunge and now have a shelf in the pantry with w/b beef & cabbage vegetable soup, carrots, and chicken and dumplings. I was concerned that the baths, afterward, appeared a tad greasy. (These were two separate canning events.) I checked all the jars, even turn them upside down after they cooled and all seemed fine. Of course the chicken concerns me more, but I did add vinegar - though maybe only half of what you recommend. What do you think?